Feature · Panels
The panels and what they stand on.
Fill a roof face, drag out a panel array or move an existing one. Each roof face gets its own mounting type and system, and the bill of materials is worked out from the layout.
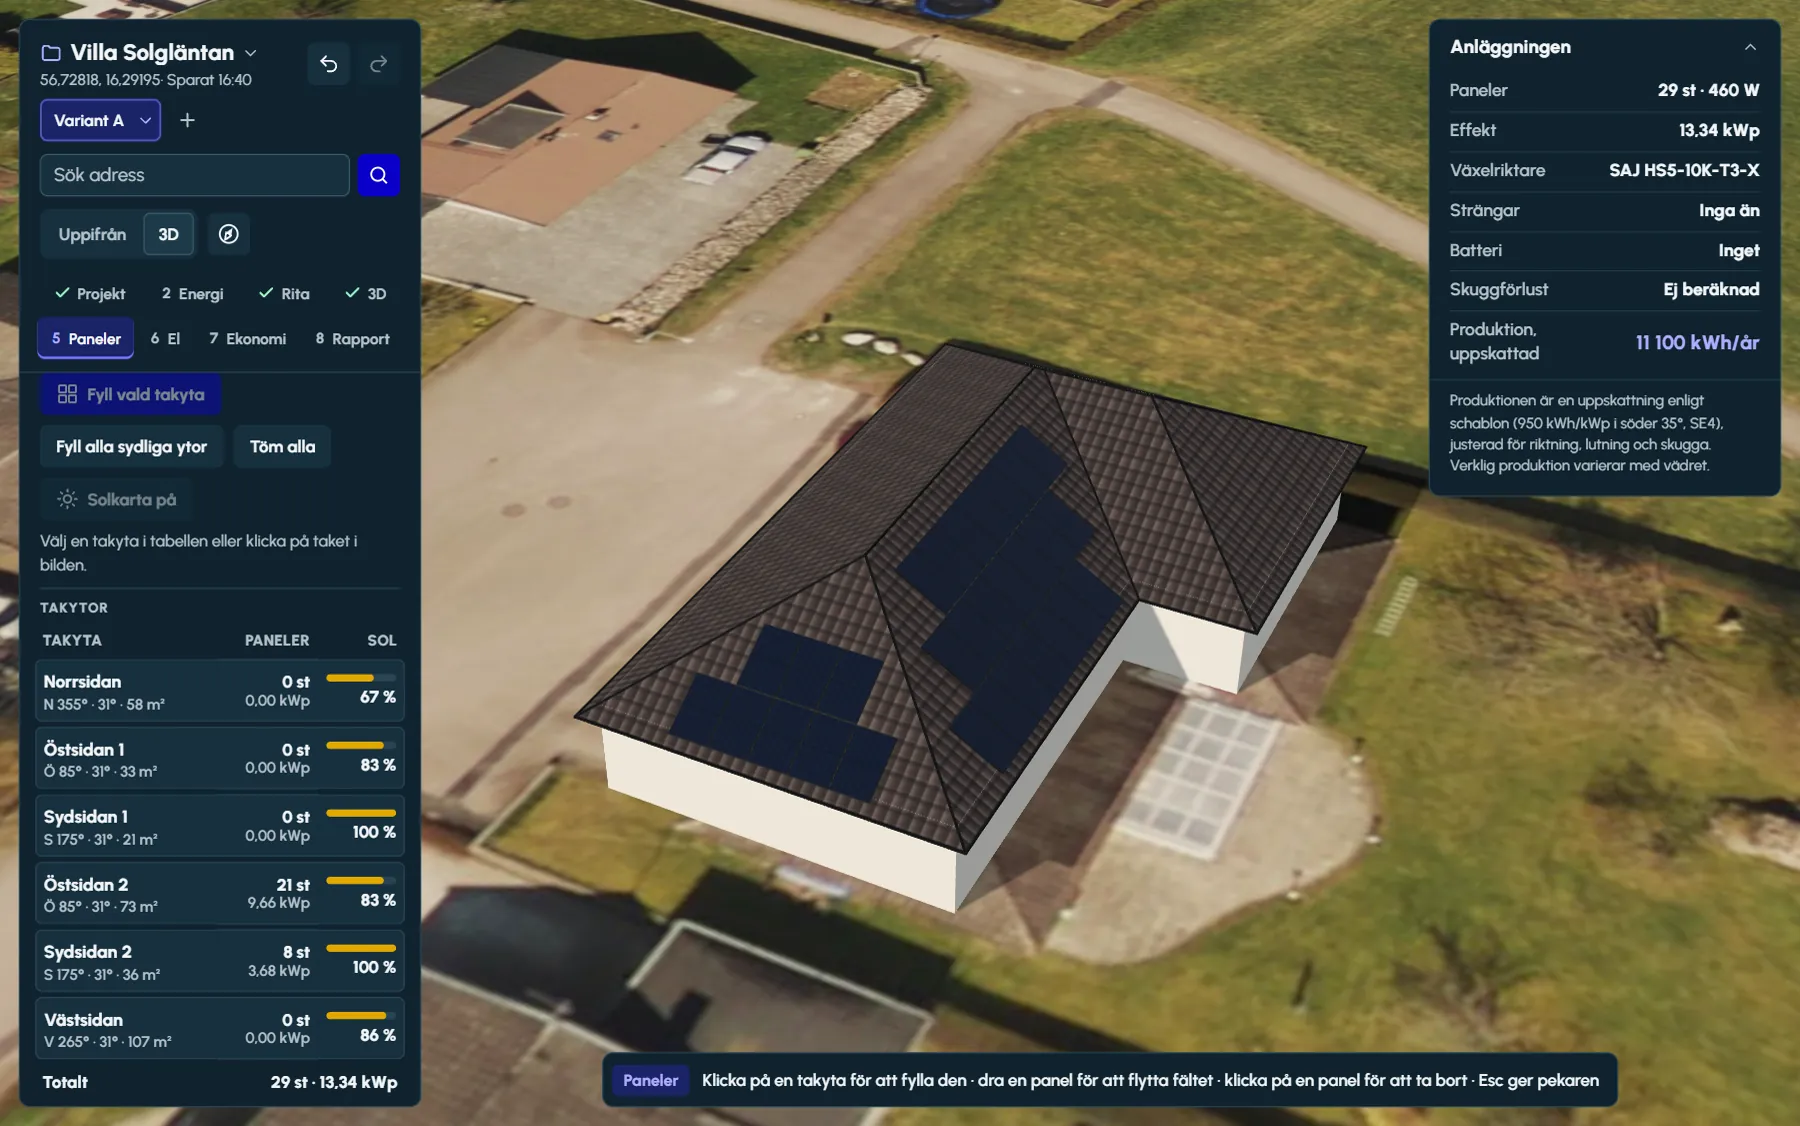
Fill a roof face – or every south-facing one
The panel is chosen from the register, with dimensions, power and electrical data from the manufacturer’s datasheet. Choose portrait or landscape, the edge distance from the roof edge and the gap between panels. The settings apply when a face is filled.
Fill selected roof face places as many panels as will fit, row by row from the eaves. Fill all south-facing faces does the same on every pitched roof face oriented between east and west via south. Chimneys, vents and dormers have a clearance zone around them, and any part of the roof hidden by a taller building part is left empty.
The table of roof faces shows orientation, pitch, area, panel count and kWp per face, and how much sun the face receives compared with a south-facing roof at a 35 degree pitch.
The defaults
- 0.35 m
- edge distance from the roof edge
- 2 cm
- gap between panels
- under 5°
- roof faces that can take east–west or south-facing racking
- 0.30 m
- valley gap between east–west pairs
Draw, move and select panel arrays
With the panel tool you drag out a rectangle on the roof face, and the designer shows the panels that fit as you drag. Arrays drawn in several goes snap to the same grid. A click removes a panel and Shift+click adds one.
Grab a panel array and drag it to a new position on the same roof face. The array snaps to the roof’s edge distance and lines up with other arrays; a position where it does not fit is shown in red, and the array jumps back. The arrow keys move selected panels by 10 cm, or 1 m with Shift. On a touchscreen, hold your finger still for a moment before you drag.
Esc gives you the pointer. Drag a box from an empty part of the roof to select panels – Shift adds and Ctrl toggles – and Delete removes all selected panels in one step that can be undone. Ctrl+A selects every panel on the selected roof face.
East–west on flat roofs
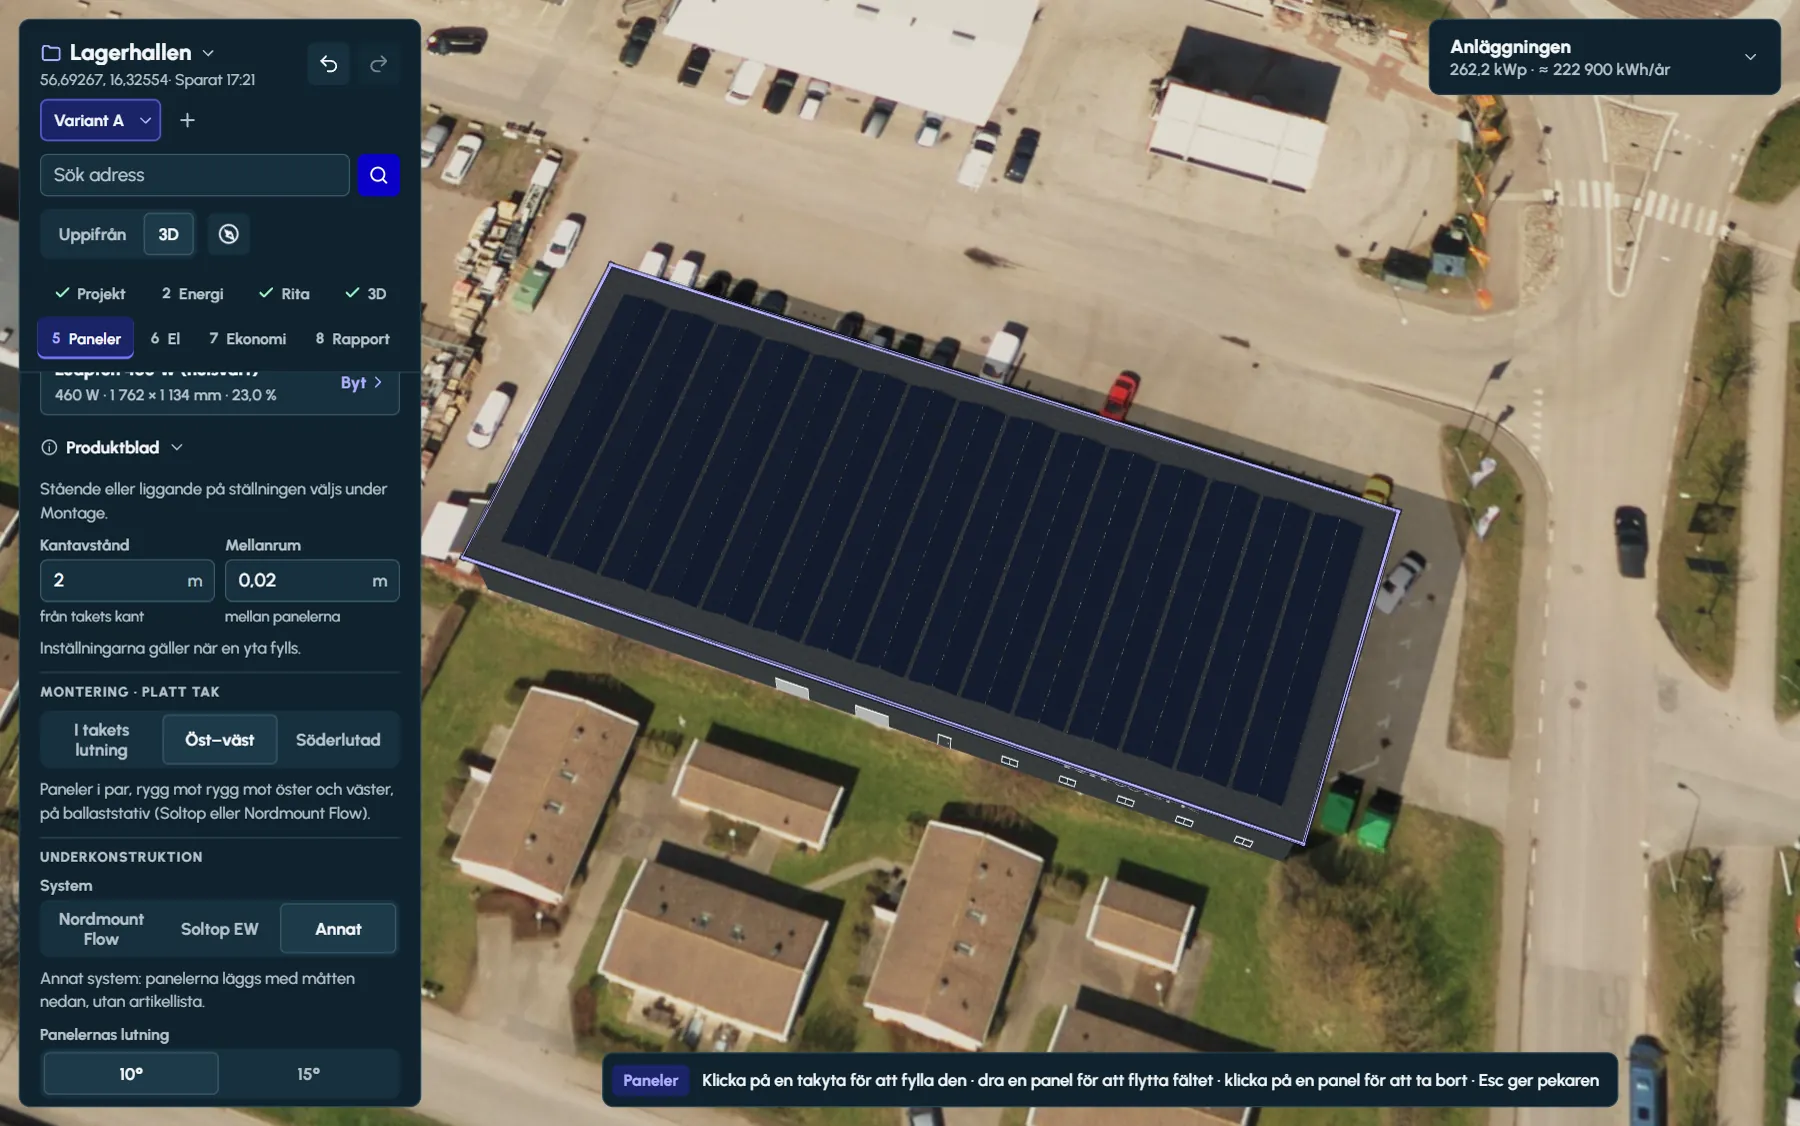
On a roof face with a pitch below 5 degrees you choose the mounting type: flush with the roof, east–west or south-facing. East–west sets the panels in pairs, back to back, facing east and west. The tilt is chosen from 10 and 15 degrees and the tilts the selected system is available in.
The valley gap – the clear space where the low edges of the pairs meet – is 0.30 m by default and can be changed, as can the ridge gap between the high edges and the gap along the row. Maintenance walkways are inserted between the pairs at regular intervals with their own width, 0.60 m by default. The designer shows the c/c spacing between the pairs.
The panel can be tilted along its short side or its long side; a selected system may decide this. The rows follow the walls of the building.
South-facing rows
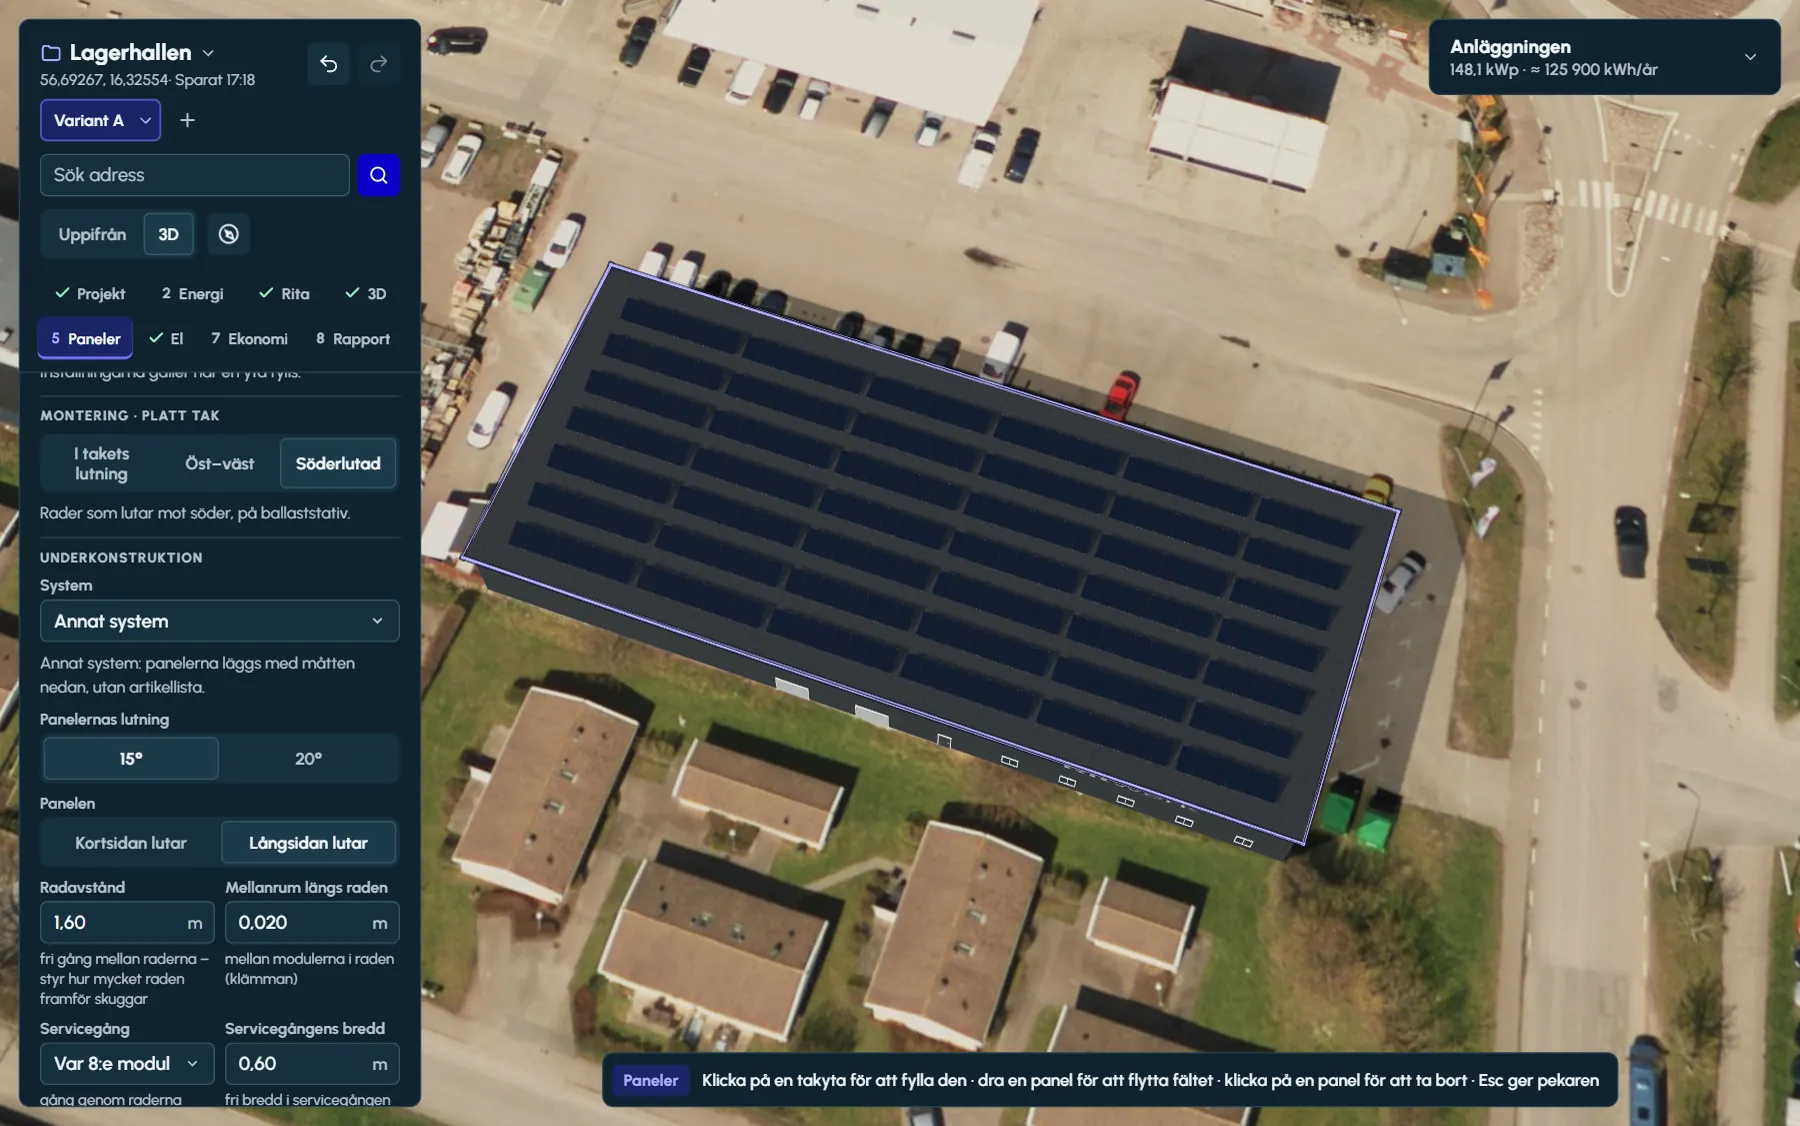
South-facing places rows tilted towards the south, 15 or 20 degrees by default plus the system’s own tilts. The row spacing is the clear space between the rows, 1.6 m by default.
Tighter row spacing gives more rows but more shading from the row in front when the sun is low. In the shading analysis the rows shade each other, so the spacing can be tested against the loss. Maintenance walkways through the rows are inserted every few panels.
Mounting systems – 12 systems in the catalogue
- Flush with the roof: Weland PF1400 roof hook for clay and concrete tiles, FF1400 seam clamp for standing-seam metal and rails directly on profiled sheet metal; Nordmount Hyper for tiled roofs, standing-seam metal and profiled sheet metal
- East–west: SOLTOP Duraklick EW (10°, 15° on request) and Nordmount Flow (10°)
- South-facing: SOLTOP Duraklick ECO (10°, 15° and 20°) and SR (10° and 20°), Nordmount Flow S (10°) and Weland’s low-pitch system (10°)
- Another system on a flat roof, or none chosen on a pitched roof: the panels are placed with the dimensions you enter, without a bill of materials
System and bill of materials
The picker shows the systems for the roof face’s mounting type, and on pitched roofs only those that suit the roofing material. A selected system enters its own dimensions and locks those that cannot be changed, and tilts the system does not offer are greyed out with an explanation. Details that could not be verified with the manufacturer are marked preliminary.
With a system selected, the designer works out the bill of materials from the actual layout: rails cut from the manufacturer’s lengths, fixings, end clamps and mid clamps, end caps and rail connectors, following the manufacturer’s installation instructions. The list is in step 8, can be downloaded as CSV and is included in the report’s full level. Ballast for racking is calculated by the manufacturer in their own software, and the designer tells you which.
Questions and answers
Questions and answers
Can we put an east–west system on a flat roof?
Yes. On a roof face with a pitch below 5 degrees you choose East–west, and the panels are set in back-to-back pairs. Tilt, valley gap, ridge gap, gap along the row and maintenance walkways can be set, and SOLTOP Duraklick EW and Nordmount Flow are available as systems.
Can a panel array be moved?
Yes. Grab the array and drag it across the roof face. It snaps to the edge distance and to other arrays, and a position where it does not fit is shown in red. Selected panels can also be moved with the arrow keys, 10 cm per press or 1 m with Shift.
Does the designer give a bill of materials for the mounting?
Yes, once a mounting system is selected for the roof face. Rails, fixings, clamps, end caps and rail connectors are worked out from the layout following the manufacturer’s installation instructions. The list is in step 8, can be downloaded as CSV and is included in the full report. Ballast for racking is calculated in the manufacturer’s own software.
What if our mounting system is not included?
On a flat roof, choose Other. The panels are then placed with the dimensions you type in – tilt, valley gap or row spacing, gaps and maintenance walkways – but without a bill of materials. On a pitched roof, leave the mounting system at None selected; the panels then follow the roof pitch, also without a bill of materials.
Read next
- East–west or south on flat roofsMore kWp per m² or more kWh per kWp – the comparison with figures for four locations, ballast, walkways and fire safety.
- Row spacing for ground-mounted PVThe formula for unshaded row spacing, ground coverage ratio (GCR) and worked examples for four latitudes.
- Mounting and loadsSnow and wind loads to BFS 2024:6: wind zones, fixings per panel and the largest c/c spacing per roof face.
- Ritwerk vs PV*SOL premiumA Windows program with a large database versus a browser-based solar designer with the loads in the drawing.
Try it on a real roof.
The designer opens in your browser, with no account. Search for an address and start drawing.